

Dropped ceiling box kit
For your DIY fibre optic star ceiling project
This product is temporarily out of stock. We are doing our best to resolve the issue and find an alternative supplier. You can sign up on our waiting list on the product page to get a notification, once the product is back in stock.
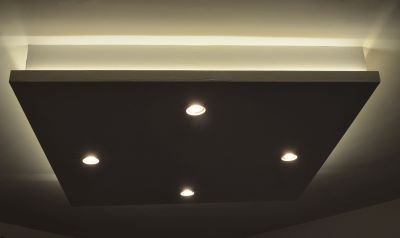
With the Kinook dropped ceiling box kit, it is easy to create the metallic frame for a dropped ceiling. The frame can be then mounted with plasterboard, wood or MDF panels.
Build it in the shape and dimensions that best fit your needs. It’s ideal for fibre optic star ceiling projects with lack of access to the void area above the ceiling.
Kinook is an innovative DIY solution for your interior design needs
The DIY dropped ceiling box kit includes the following items:

Small block (16 pcs)

Large block (4 pcs)
The metallic studs (those used for drywall partition wall construction) are not included in the kit. As C-studs dimensions vary from one brand to another, check our compatibility table before purchasing.
Our customers said
Benefits of the Kinook dropped ceiling lighting block system
With Kinook blocks you can easily implement any of your desired dropped ceiling light box ideas.
Simple

As in a construction game, create the metallic structure by assembling the studs with the Kinook blocks.
Accurate

The structure can be adjusted to the correct levels and dimensions before secured into place.
Robust

Panels + metallic studs = robust construction.
Fast
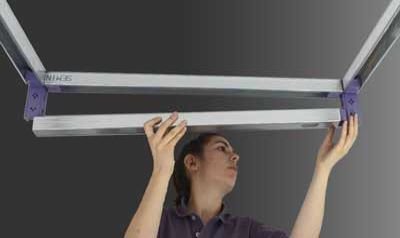
No need for highly precise cutting, the structure is assembled directly into perfect right angles.
Looks great!

Your designs can be tailored to your needs and perfectly integrated to fit your interior.
Economical

Cut back costs by using tools and material that are simple, affordable and ubiquitous.
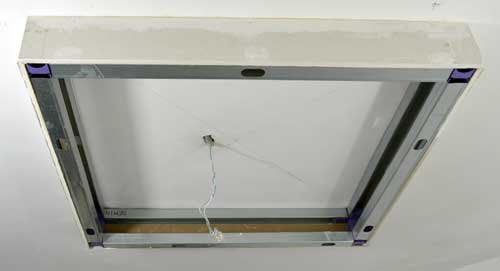
Dropped ceiling light box kit installation
The construction of the box can be done according to two different assembly methods depending on the thickness of the box you want to obtain. If you’re creating the structure with the fibre optic light engine concealed inside, consider the height of the light engine and always add an access hatch on the least visible side of the structure so the light engine can be serviced if needed.
Materials needed for false ceiling installation:

C-studs (not included in the kit). As C-studs dimensions vary from one brand to another, check our compatibility table before purchasing.
Panels: plasterboard, wood, MDF, etc.
Screws
Finishing materials (paint, fabric)
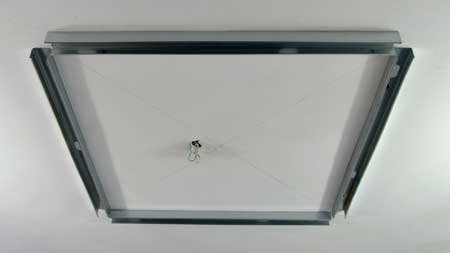
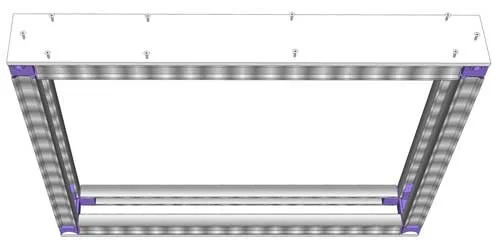
Option 1: Fixed height installation
The thickness of the box is set by the length of the long Kinook block (115mm)

Click for details
Step 1:
Cut the C-studs:
4 studs: length minus 11 cm
4 studs: width minus 9 cm
The studs dimensions are slightly shorter than those of the dropped ceiling in order to clear the corners and allow the Kinook blocks to inserted into the studs.
Mark the position of the studs on the ceiling (or the wall) and fix them into place.

Step 2
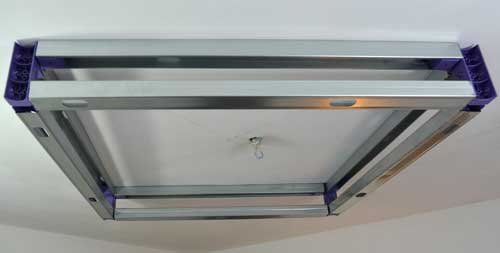
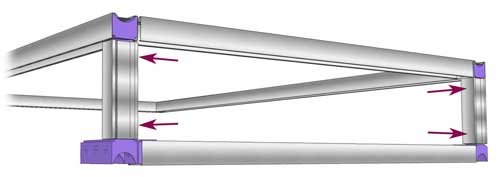
At each corner, Insert a small Kinook block at the studs ends and assemble them with a long Kinook block.


Step 3
Assemble the metallic frame using the C-studs you have cut on step 1.


Step 4
Screw on the lateral panels (Plasterboard or other material).
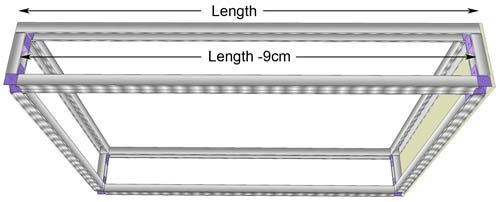
Option 2: Adjustable height installation
The thickness of the box is set by the length of the vertical studs

Click for details
Step 1:
Cut 6 studs:
2: dropped ceiling length
4:dropped ceiling width minus 11 cm
Insert small Kinook blocks at each angle (as per figure above). Mark the position of the studs on the ceiling (or the wall) and fix them into place.

Step 2
Assemble the metallic frame starting with the narrowest side. It may prove difficult to get the metallic frame to hold together without the facing panels. A few tips to address this issue:
Tighten the ends of the vertical metal studs before inserting them over the Kinook blocks.
Fit a screw into each end of the vertical metal studs, then remove it to create a metallic chip that will stop the Kinook block from sliding.
Screw the metal studs into the Kinook blocks (on a side that will not be mounted with facing panels).
Step 3
Fix the first lateral facing panel. This panel will serve as the base, holding the metallic frame together.

Step 4
Cut 2 studs: dropped ceiling length minus 9 cm.
Assemble the rest of the metallic frame.
Step 5
Secure the side panels with screws.
Note: plaster (or acrylic joint) can be added to the panel edges that will be mounted to the ceiling. This will ensure a better hold of the box to the ceiling. For a smooth finish, scrape off the excess plaster once the construction is fixed.

Step 6
Close up the dropped box by screwing on the horizontal panel.
Installation tips for drop ceiling box light kit
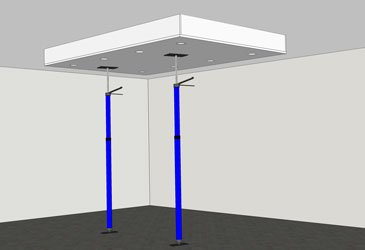
Telescopic support can be used to properly position and support the horizontal panel.
A small access hatch can also be installed. Preferably position on a side non-visible.

For plasterboard ceiling use a detector to locate studs (or beams) inside the ceiling. Screw the dropped ceiling studs preferably on these studs/beams.

Contact Stellar Lighting
If you have any questions about our available products, please get in touch with us! Use the form below, or alternatively email info@stellarlighting.co.uk, call or WhatsApp message us on +44 (0) 20 8050 5636.